
Piranesi and Autodesk® Revit®
Here's how to create a Piranesi EPix file from a model created in Autodesk Revit® Architecture 2009 or 2010 (if you have Revit 2011 or later, we have an EPix add-in which is easier to use).
You'll need Piranesi 6, Piranesi 5.1, Piranesi 2010 Lite, or Piranesi 2010 Pro to use FBX files as described below. With earlier versions of Piranesi, export to DXF then use Vedute to import the DXF file, define a viewpoint, and export an EPix file.
To export your Revit model to an image file
- Start Revit and open your model.
- From the Project Browser, select the 3D view you wish to use.
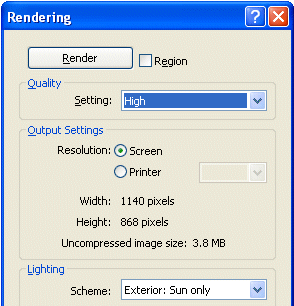
- On the Design bar, click Rendering and then select Rendering Dialog.
- On the Rendering dialog box, click Render.
Make a note of the pixel Width and Height values as you will use them later.
If you want a better resolution than "Screen", select the "Printer" option under Output Settings and select the required DPI from the list.
- When the rendering has finished, click Export.
- On the Save Image dialog box, select png from the file type list, specify a name for the file and click Save.
- Close the Rendering dialog box.
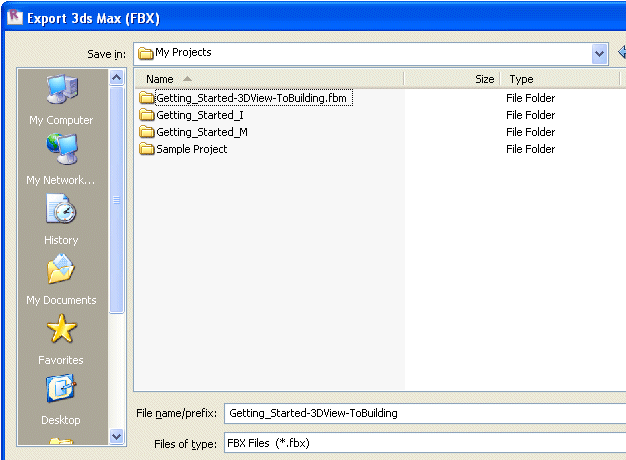
- From the Revit File menu, select Export and then select 3ds Max (FBX).
- On the Export 3ds Max (FBX) dialog box, specify a name for the file and click Save.
For Revit 2017, select "FBX 2015 and previous (*.fbx)" as the file type.
To create your EPix file
- Start Vedute and select Open Model from the File menu.
- In the Open Model dialog box, select the FBX file that you previously saved and click Open.
- From the Window menu, select Named Views.
- From the list of views, select the saved view and click Apply.
- If you wish to add a ground plane, on the Edit menu, click Add Ground Plane and specify the size and height for the ground plane in the dialog box and click OK.
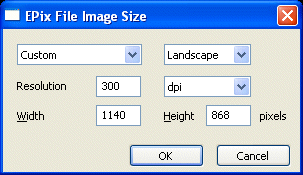
- From the Edit menu, select Image Size and change the pixel sizes to match the sizes you noted earlier if necessary:
To overlay the rendered image on the EPix file
- Start Piranesi and select Open from the File menu.
- In the Open dialog box, select the EPix file that you previously saved and click Open.
- From the File menu, select Import.
- On the Import dialog box, select the png file that you previously saved and click Open.
- On the File menu, click Re-Render to write the current RGB channel to the Restore RGB channel.
- Save the EPix file.
Autodesk and Revit are registered trademarks or trademarks of Autodesk, Inc., and/or its subsidiaries and/or affiliates in the USA and/or other countries