
Autodesk Revit Add-in
Our EPix add-in lets you export a 3D view from Autodesk® Revit® Architecture to a Piranesi EPix file. Piranesi 6 Pro is required. If you have Piranesi 2010, there's a free upgrade.
Add-in for Autodesk Revit Architecture 2011
Add-in for Autodesk Revit Architecture 2012
Add-in for Autodesk Revit Architecture 2013
Add-in for Autodesk Revit Architecture 2014
Add-in for Autodesk Revit Architecture 2015
Add-in for Autodesk Revit Architecture 2016
Revit 2017
We are sorry that our plugin for Revit 2017 has been delayed. This is because the Revit 2017 API exports a newer version of FBX that we don't support.
As a workround, you can create the EPix file yourself. When you export to FBX, choose "FBX 2015 and previous (*.fbx)" as the file type.
FBX Converter
We recommend that you also install the FBX® Converter from Autodesk: this will improve the naming of materials in the EPix file so that material locking works better.
The FBX Converter for Windows can be downloaded from the Autodesk FBX website.
Export an image file (optional)
If you want your EPix file to use the colours rendered by Revit, first use Export / Images and Animations / Image to save the 3D view to an image file. Set the image size to fit the EPix file size you want, and choose PNG format for high quality.
(without an image file, the EPix file will be rendered by Vedute with random colours)
Export to an EPix file
- Open a 2D view so that the External Tools button is enabled
- On the External panel on the Add-Ins tab, click the "External Tools" button then select "Create EPix File":
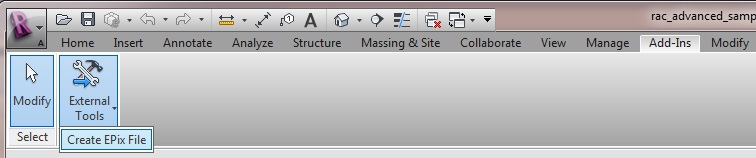 (if the Add-Ins tab is missing, check the add-in is installed;
if the button is greyed out, open a 2D view).
(if the Add-Ins tab is missing, check the add-in is installed;
if the button is greyed out, open a 2D view).
The add-in options will be shown:
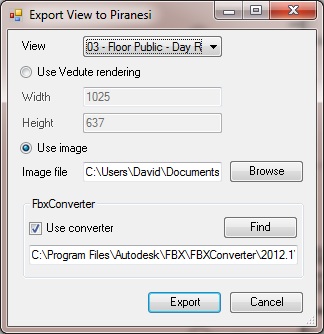
- Select your 3D view from the dropdown list
-
If you saved an image, select "Use image" and browse for the image file.
Otherwise, select "Use Vedute rendering" and choose a width and height for the EPix file.
If you have installed the FBX Converter, select "Use Converter" and click Find to locate FbxConverter.exe.
This pathname will look like "C:\Program Files\Autodesk\FBX\FBXConverter\2013.3\bin\FbxConverter.exe" or may be in "Program Files (x86)"
- Click Export to create an EPix file from your 3D view and automatically open it in Piranesi.
Having Problems?
- The External Tools button is greyed out
Select a 2D View to enable the button, then click to run the EPix add-in and choose the 3D view to export. - An error message is shown
Check the message in the dialog. If it mentions Vedute, check that you have installed Piranesi 6 Pro. If you have Piranesi 2010 Pro, try upgrading. - The colours are wrong
Save the rendered image to a PNG file, as shown above, then select "Use Image" and browse for your image. The EPix file will be the same size as the image. You can also use File/Import in Piranesi to update from your image if the model has not changed. - Too many material names are defined
Install the FBX Converter as described above. - The EPix file is rotated by 90 degrees
This problem in Piranesi 2010 is fixed in Piranesi 6 Pro. - The EPix file is low resolution with jaggies
Choose a larger image size to increase the resolution. The recommended size depends on your display or printing needs, but remember that larger images will use more memory in Piranesi. Up to 4K pixels width may be sufficient. A typical limit for 32-bit Piranesi on Windows 32-bit is around 8K to 10K, so keep well below that if possible. 64-bit Piranesi can access more memory.
If you need further help, please contact us.
Autodesk, FBX and Revit are registered trademarks or trademarks of Autodesk, Inc., and/or its subsidiaries and/or affiliates in the USA and/or other countries